Picture Postcard Workflow, raw processing and the sharpening workflow
The sharpening intricacies
Two words come to my mind when I think of image sharpening: complex and subjective. Many different sharpening methods exist; the best choice depends on image as well as output characteristics. Noise and subject matter play an important role. For print output, optimal sharpening is different than for web display. Artistic considerations must be taken into account. Some say it should be done in multiple phases. And last but not least, tastes are diverse. What looks like a proper sharpening to one, may appear over- or undersharpened for another.
In sharp contrast with all this complexity is the general concensus about the place of sharpening in the image enhancement workflow: at or near the end. First do fixing and enhancing work, then resize for output, then sharpen. That’s how it is usually dictated, and it makes sense. Every sharpening method strengthens edges. Doing that, and then continuing with all sorts of contrast enhancing moves, would make edges stronger than good, and give the image a crunchy look. Nothing surprising, and nothing new for the experienced Photoshopper, I assume.
Or...?
There is one little thing that seems to contradict the above principle. Open a raw image that you haven't processed yet in Camera Raw or Lightroom and switch to the Details section. You will notice that the default sharpen amount is set to 25 (if you haven’t overruled this). See figure 1. So despite the golden rule to only sharpen at the end of the process, here sneaks a light sharpen action into the raw processing, i.e. somewhere near the beginning.
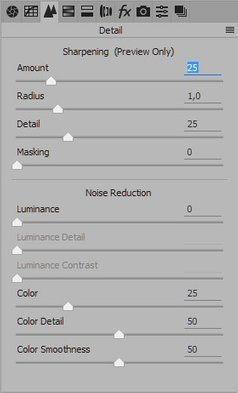
Figure 1. The Detail panel with factory defaults. Left ACR, right LR.
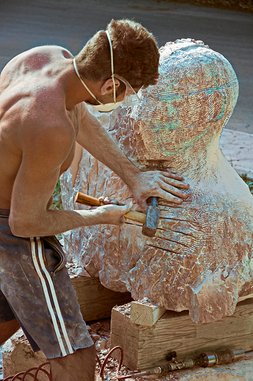
Sculptor
I have been aware of this sharpen setting for a long time, wondered why it was like that, but for some reason was afraid to do anything about it. If the default is 25, maybe better not touch it, right? People who know better than me have made this choice, so…
The value of 25 is of course overridable, either manually or by creating profiles that tell the raw processor to automatically apply a different setting. The question now is: should we do this, in cases where a PPW treatment lies ahead? Is it better to change sharpen amount to 0, or anything else than 25, given the heavy PPW processing that will be applied subsequently?
Before I answer this question, let me digress a bit.
The sharpening workflow
You may have heard about something called capture sharpening. This concept stems from the notion that practically every (raw) digital image is soft – caused by anti-aliasing filters and demosaicing. Sharpening is executed at least partially to compensate for this. This, so I used to think, had to be the reason for the default sharpening setting of 25 in ACR and Lightroom. Just a bit of sharpening at the beginning of the process to prevent working on an overly soft image. Who knows what negative impact an initial softness may have on the final result?
Capture sharpening – I digress even further - is part of a sharpening workflow that was devised by the late Bruce Fraser. This workflow is laid out in the book “Real World Image Sharpening” by Fraser and Jeff Schewe - see figure 2.

Figure 2. The book cover
The central idea of this book is that optimal sharpening is accomplished by using a three-phase approach: capture, creative and output sharpening. Let me summarize these:
- Capture sharpening is supposed to counter softness that is typical of digital images – whether coming from a scanner or from a camera. Its parameters are mainly based on the properties of the original image, from technical viewpoint (e.g. noise) or content based (e.g. frequency characteristics).
- Creative sharpening can be any sharpening-related enhancements that are inspired by artistic considerations. Some extra local sharpening where it looks good, some background blurring to bring more depth into the image, etc.
- Output sharpening is done right before an image is sent to a printer or any other output device. It is solely driven by properties of that device.
(I bought and read this book. It’s definitely worthwhile, but the three-phase approach doesn’t fit the PPW philosophy at all. For some time I thought that I could give the PPW Sharpen action a place in the Fraser/Schewe workflow, but I gave up. It’s probably a combination of all three phases, let’s leave it at that.)
Arriving at the conclusion
One thing though that is made very clear in the book is the following simple statement: if an image requires serious color and tone corrections, do them first before any sharpening. This includes phase one of the workflow, the capture sharpening. The reasons, as listed in the book, are familiar: sharpening halos can be strengthened and become objectionable; noise, accentuated by the early sharpen, can become visible; or even the sharpening effect can be partially destroyed during the process.
Let me repeat that statement: if an image requires serious color and tone corrections, do them first before any sharpening.
See figure 3 below, taken from this very book, to support this. The red circle in the marked rectangle contains the text "Tone & Color Corrections" and is placed before "Photoshop Capture Sharpening".
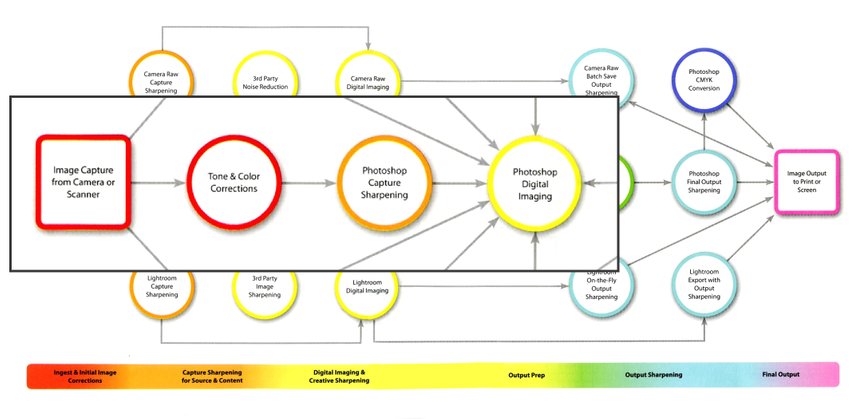
Figure 3. Sharpening workflow in a diagram, from the book "Real World Image Sharpening"
I find it important to emphasize this, because it contradicts what seems to be a common misconception. Many websites tell you, under the heading of “capture sharpening”, to routinely apply some sharpening during the raw processing phase. This may be fine if you do all processing in ACR or Lightroom. However, following from the above statement: a positive sharpen amount during raw processing cannot be a proper implementation of capture sharpening if the image is afterwards brought into Photoshop for further color and tone enhancements.
Now we are getting to the point: this is something we can relate to the PPW. If anything, the PPW causes a lot of tonal and color moves in Photoshop proper. So how could the conclusion be anything else than setting the sharpen amount to 0 in the raw processing phase?
Right, so here is my recommendation for PPW employers:
- In ACR or Lightroom, or any other raw processor that you might use, refrain from any sharpening.
The tutorials
This could finish my article, but as a free extra service, here is a short tutorial section explaining how to turn off automatic sharpening in Adobe's raw processors.
Note: Below tutorials do not work any more from Lightroom 9.2 / Camera Raw 12.2 on (Feb. 2020). Adobe introduced a completely new system, incompatible with the old way of working. I published a full article about it: https://geraldbakker.nl/tutorials-actions/how-to-set-raw-defaults.html
First, Camera Raw.
- From within Photoshop, Menu: Edit – Preferences – Camera Raw…
In the presented popup, two checkboxes are relevant: “Make defaults specific to camera serial number” and “Make defaults specific to camera ISO setting”. See figure 4. If you check neither, defaults are still specific, namely to camera type. I believe it makes sense to check the ISO box, and leave the other unchecked, but that's up to you. Just be aware that the more specific you choose to go, the more times you have to configure a default sharpen amount (or any default for that matter).
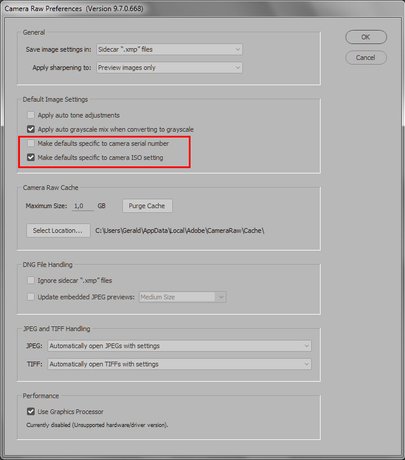
Figure 4. The Camera Raw Preferences window
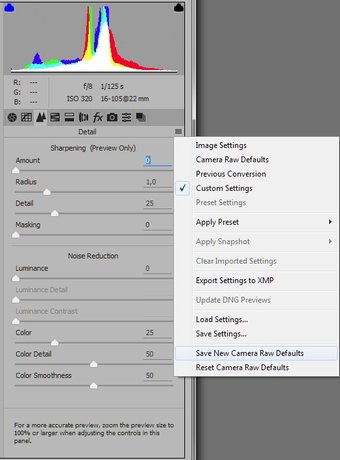
Figure 5. How to save new ACR defaults
Right - now let's continue the tutorial.
- On the Camera Raw Preferences window, hit OK after you've made your choice
- Open any raw image file. Note, the title bar of the Camera Raw window contains the camera type that you're now working with
- Move to the Detail tab and set Amount in the Sharpening section to 0. Do not touch any other settings, sliders, etc.!
- From the menu on the Detail frame, click “Save New Camera Raw Defaults”. Be aware that this includes all settings, not just the ones from the Detail tab. See figure 5.
Note that the defaults are now saved for the current camera type. If needed, open a raw file from a different camera type and follow the same procedure. If you checked the box for ISO-specific settings, you now have to run the procedure for every ISO value you ever expect to use. That may sound like a tedious task, but you only need to do it once, plus it gives you the privilege to set noise reduction defaults per ISO value - not a bad idea if you ask me.
For Lightroom, the procedure is similar:
- From within Lightroom, Menu: Edit – Preferences…
- Open the Presets tab and check or uncheck “Make defaults specific to camera serial number” and “Make defaults specific to camera ISO setting” as desired - the same considerations as for ACR apply. See figure 6.
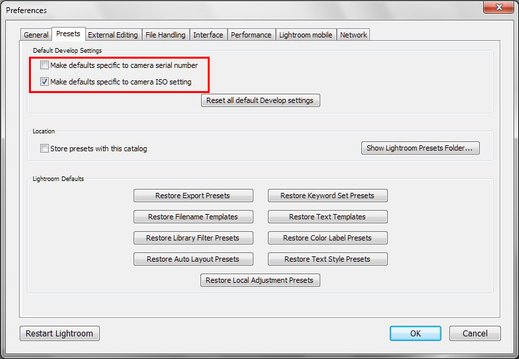
Figure 6. The Lightroom Preferences window
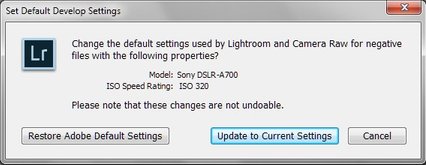
Figure 7. Saving Lightroom defaults
- Click OK
- For each applicable camera type, serial number (if checked) and ISO value (if checked) open a raw file
- Go to the Develop module, open the Details section and set Sharpening Amount to 0
- Menu: Develop – Set Default Settings…
- Click “Update to Current Settings”. Like in the ACR recipe, all current settings are included. See figure 7.
The good news is that, if you happen to use both Lightroom and ACR on the same computer, defaults need only be saved for either of the two – they are picked up by the other.
Gerald Bakker, 30 Nov. 2016 / rev. 9 May 2017
Related articles


Picture Postcard Workflow