Channels part 3: The powers and blessings of Apply Image
What’s in a name?
The name Apply Image may be confusing. One can apply a procedure, apply for a job, apply paint to a wall or even apply oneself, but apply an image…? Apply to what? It sounds like a commit of some kind. I finished processing this image, so now let me apply it, like a Save action.
A better name might have been Blend Image, but I won’t propose to change it. Every serious retoucher knows about it, many websites and Photoshop books refer to it. It’s an extremely useful and versatile Photoshop command. Various steps in the Picture Postcard Workflow rely on it. Luminosity Masking is based on it. It’s the tool for superimposing images over each other.
Apply Image blends an image into another image, while letting the user specify blend mode and opacity. For image one can read: a pixel layer, a layer mask or a channel. It can work across different image files, provided they have the same pixel dimensions. (An image with different dimensions cannot be used in the process.) It can copy color as easily as monochrome information. And last but not least, it has a simple, intuitive interface.
Any disadvantage at all? Sure. Unlike Channel Mixer, which can be applied as an adjustment layer, Apply Image always changes pixels - whether in a layer mask, channel or on a plain layer. Modifying a pixel layer in this way is a so-called destructive way of editing. Apart from rolling back through history states, there is no revision possible.
But first, let’s look at how it works.
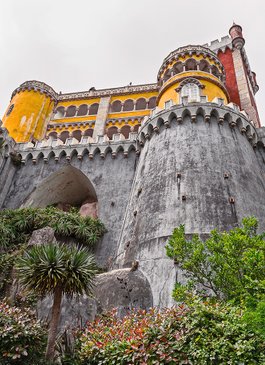
Sintra, Portugal
The mechanics 1: Target
So, we want to apply one image onto another. There must be a source – one image – and a target – another image. The process starts with establishing the target. This is a natural thing – after all, the target is what we are going to modify. As I mentioned before, it can be a pixel layer, a layer mask or a channel. If we happen to wish for a new channel, we first have to create one and then make that the target. Should we want to invoke Apply Image on an adjustment layer, or any of its color channels, well, that’s not possible, for obvious reasons.
Now the target must be made active.
- For a pixel layer, this means: click on it in the Layers panel. Make sure the layer that you want to update has an extra border around it.
- For a layer mask, this means: click on the mask icon in the Layers panel. Make sure the mask that you want to update has an extra border around it.
- For a channel, this means: the channel must be selected. It must be the only channel that has a gray selection bar around it.
See figure 1 below for the three possibilities.
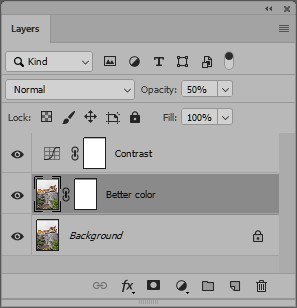

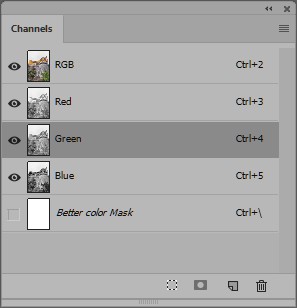
Figure 1. To define the target for Apply Image, layer (left), mask (middle) or channel (right) must be made active.
The mechanics 2: Source
So we’ve chosen the target now. Next step is to choose the source. We do that in the Apply Image dialog box. Go the Photoshop menu and choose Image – Apply Image. Photoshop shows the dialog box of figure 2. Source must be specified in the top frame. Blend options come in the bottom frame. Target – already defined – is mentioned in-between.
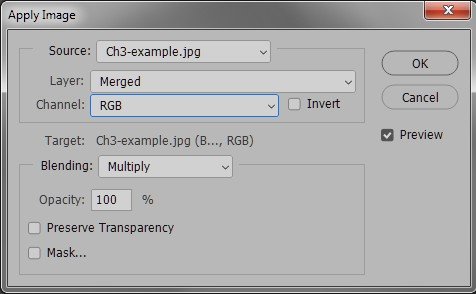
Figure 2. Apply Image in its default appearance
The entryfield Source (the image file) defaults to the current document. If there is only one file open, it’s obviously the only option, but otherwise Photoshop lets you choose from all open documents with the exact same pixel dimensions. Layer can be any of the layers that the chosen image file consists of, or Merged which has an obvious meaning. For Channel you can pick any of the available Color or Alpha channels, or the combination of the Color channels (called RGB, CMYK or LAB, depending on the current color space).
The mechanics 3: Options
In the bottom frame, the most important options are Blending and Opacity. For some unknown reason, Blending defaults to Multiply. Always reconsider that! It may be the desired choice, but usually it’s not. Opacity defaults to 100% which makes sense, although you may want to reduce this often enough.
The bottom of the Apply Image pop-up contains two checkboxes of which the meaning may not be immediately evident.
Preserve Transparancy is only relevant for a pixel layer that is partially transparant. Let’s assume we are working on a partially filled pixel layer – a layer that, simply said, contains pixels but not all of them are 100% opaque. Performing Apply Image on that layer:
- When Preserve Transparancy is checked, only updates the pixels of that layer and leaves the transparant parts alone.
- When Preserve Transparancy is unchecked, updates all pixels with whatever is in the source.
When the target is a color channel of a partially transparant layer, the Preserve Transparancy option is disabled. Apply Image can only target pixels in their current opacities. This makes sense, as otherwise a user could give one color channel a different pixel coverage than the others. (Got that, have you?) Consequently, invoking Apply Image on a color channel of an empty layer is not possible. Photoshop gives an error when you try that.
The bottom checkbox – Mask – is more intuitive. When set, another frame opens itself where the user is supposed to specify yet another layer/channel. See figure 3.
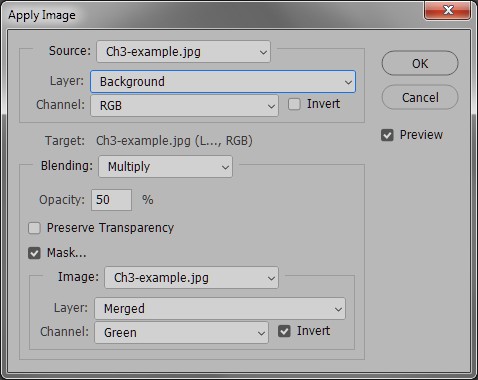
Figure 3. Apply Image with the extra Mask frame
The specified channel will then be used as a mask on the Apply Image action. So we have source, target, blend mode, opacity and mask, each impacting the net result – I don’t know how you feel about all this, but my brain is about to raise an overflow exception. Yet, it’s a usable option, and I will show an example later in this article.
The mechanics 4: Add and Subtract
When you choose either Add or Subtract for Blending, something special happens. Two extra numeric input fields appear: Scale and Offset. See figure 4.
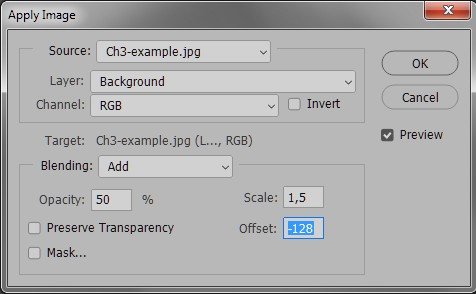
Figure 4. Apply Image with Scale and Offset entryfields
Note that blend modes Add and Subtract simply add and subtract pixel values. For such operations, it is very well possible that either of the numeric limits (0 or 255) is hit. Think of adding the current layer (source) to itself (target). It will blow out a significant part of the image. Every pixel that has R, G and B > 128 will get fully white.
For that reason, Scale and Offset have been introduced. They can, in certain ways, temper the result.
- Scale is a number between 1 and 2 (rounded off to three decimals). The result of the Add or Subtract is divided by this value.
- Offset is a number between -255 and 255. Its function is to simply add (subtract for a negative number) the given value.
Running Apply Image, target any layer, source the same layer, channel RGB, any opacity, Scale 2, Offset 0 has no effect. It will add the layer to itself and then divide by 2.
Note that Opacity is only applied after all other operators have been processed. So entering Offset 10 and Opacity 50% will effectively add 5.
In my opinion, the practical use of all these extra operands is limited. I do have an example later in this article though. Keep reading!
The mechanics 5: Result
With Preview being switched on, you can already see what the result will look like. Photoshop blends the source into the target, using all specified parameters. If blend mode is Normal and Opacity 100% (and no Mask specified), the net result is that Photoshop copies the source into the target.
As I stated before, Apply Image can copy a channel into a layer, or vice versa. Thus, it can blend something without color information with something with. Of course, monochrome remains monochrome, but it’s worth mentioning anyway. And when source and target both contain color information, it is nicely preserved – Apply Image can blend all color channels of two pixel layers in one go. (Provided of course that source and target are coded in the same way.)
This, I believe, is the major strength of Apply Image. One can blend literally anything into anything else. From a layer to a channel and vice versa. From one layer to another. Between different documents. The only important (but inevitable) restriction is that pixel dimensions of source and target must match exactly.
I will now present three examples, each implementing the same assignment: in different ways, but each using Apply Image in one way or another.
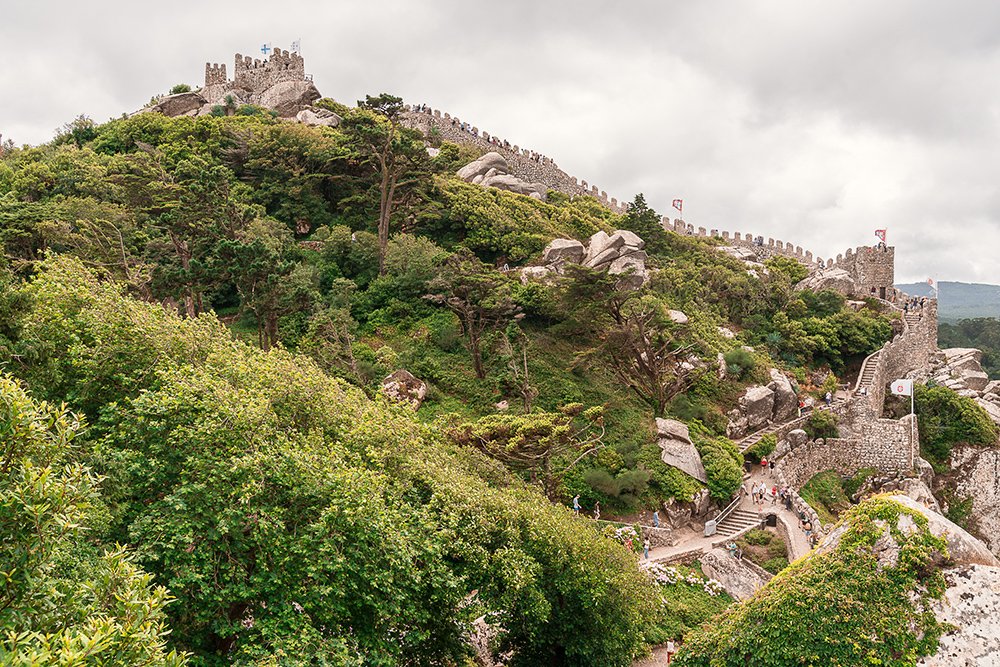
Figure 5. Original image
We start with the image of figure 5. The assignment is: make the clouds bluer while limiting the color impact on the rest of the image.
Example 1: RGB masking
The idea of the first method is to make the whole image bluer, and then construct a mask that limits the adjustment to the lighter parts of the image.
- First, add a Photo Filter adjustment layer. Pick a cyan-bluish color, the standard Cooling Filter 82 seems fine. I chose density 15%. See figure 6.
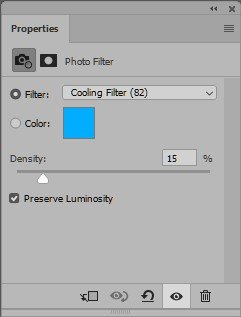
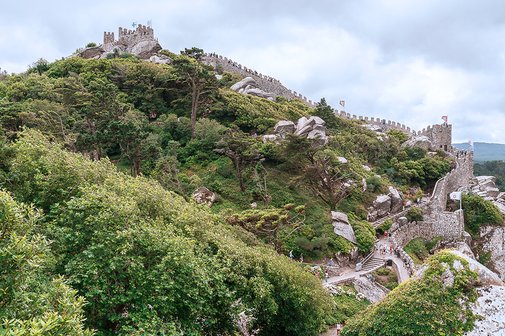
Figure 6. Filter to be applied during example 1, and intermediate result
Now, the foreground has to be masked out. Of course, we can pick a suitable brush and paint black over the greens and stones (on the mask), but the fun is to use Apply Image. We need a mask that best distinguishes foreground from sky. In RGB, that’s the Blue. So here we go.
- Click on the mask of the Photo Filter adjustment layer. A black box should appear around it.
- Menu: Image – Apply Image. Enter Source: current document. Layer: Background. Channel: Blue. Blending: Normal. Opacity: 100%. No mask.
- Hit OK.
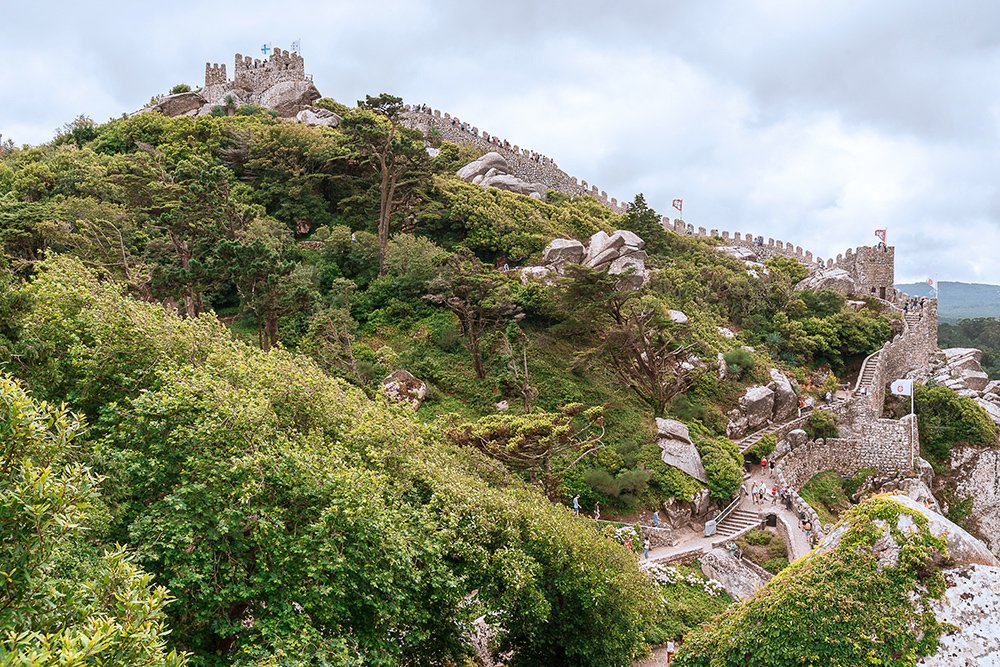
Figure 7. Final result of example 1
That’s it. Figure 7 shows the result. Note that the sky is rather blue, but the greenery has, to a reasonable extent, retained its warmth. Arguably we went too far, but that’s not the point now. You can reduce opacity to taste. I leave figure 7 as it is and continue with the second method.
Example 2: CMYK channel blending
The idea of the second method is to darken the Cyan channel in the CMYK color mode. This will darken the full image of course, but the Yellow turns out to be a suitable mask.
- Menu: Image – Mode – CMYK Color, to convert to the CMYK color mode.
- Copy the background layer, so we can compare with the original.
- Activate the Cyan channel. Click on it in the Channels panel so you see this channel only. Next, click on the eye in front of the CMYK channel. The idea is that now we can manipulate one (the Cyan) channel while seeing the full image.
- Menu: Image - Apply Image. Source: the current document. Channel: Cyan. Blending: Multiply. Leave Opacity on 100% even though the effect is pretty strong.
- Now click the Mask checkbox. We need another channel that masks the adjustment so that only light image areas are affected. Pick Image: current document. Layer: Background. Channel: Yellow.
- Hit OK to apply the action.
- Change the blend mode of the layer to Color. This is necessary because the multiply action darkened the image overall. Change opacity to taste.
Figure 8 shows the Apply Image settings to use and the final result.
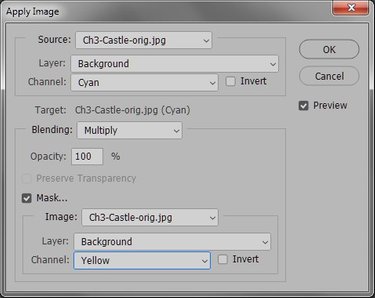
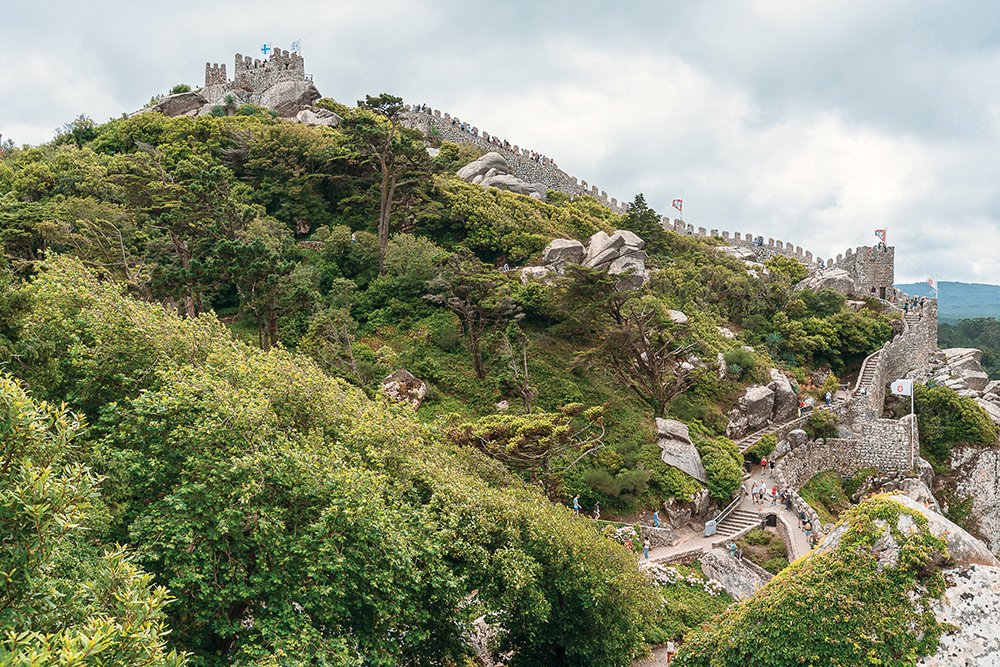
Figure 8. Apply Image to run and final result of example 2
Example 3: LAB channel blending (more complex example)
The idea of the third method is to make LAB's B channel darker where the image is lighter. To separate sky from foreground, we will again use RGB's Blue channel. So here is the suggested procedure (starting over again from the original image):
- While still in RGB, copy the Background layer and convert it to a Smart Object.
- Open the Smart Object and Menu: Image – Mode – Lab Color, to convert to the LAB color mode
- Activate the B channel. Click on it so you see the channel only. Next, click on the eye before the Lab channel. We can now manipulate the B channel while seeing the full image.
The idea now is to first Subtract (part of) the original Blue channel from LAB’s B, and then manipulate Scale and Offset to get an optimal result. So:
- Menu: Image – Apply Image. Enter Source: original document (not the smart object). Layer: Background. Channel: Blue. Blending: Subtract. Scale 1 and Offset 0.
- The image is now a blue mess; reduce Opacity to 10% and the sky starts to look like we want it to, but still the greens have lost too much of their color (see figure 9).
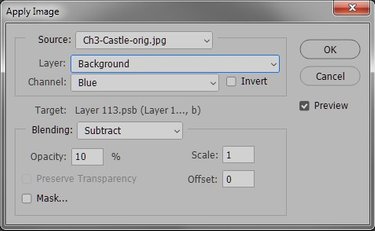
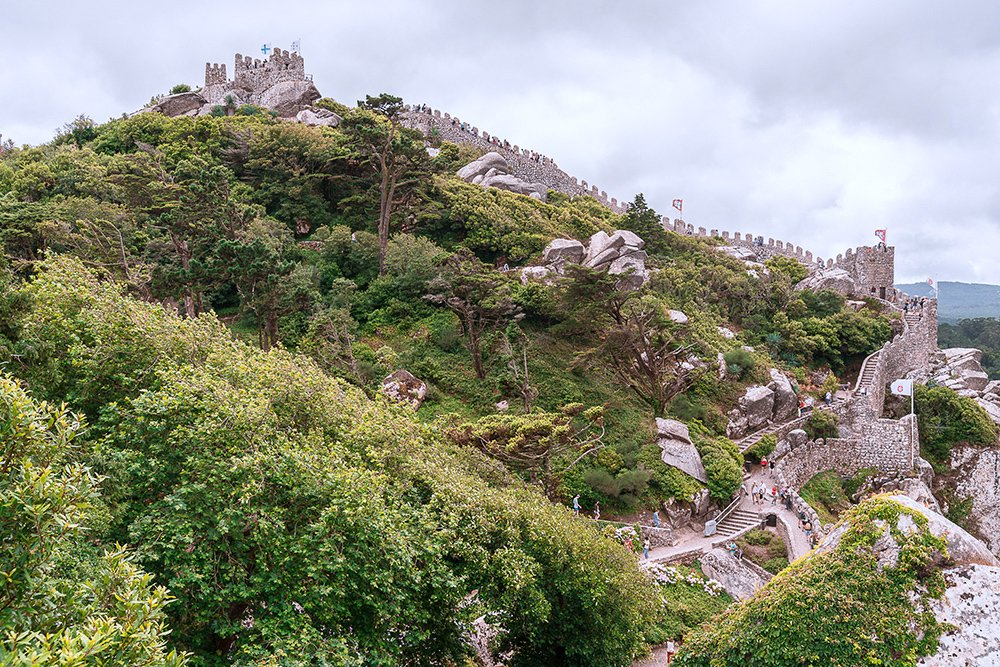
Figure 9. First attempt Apply Image and intermediate result
- Here comes the trick. Change Opacity to 15%. This makes the sky considerably bluer and the greenery a bit worse. Now change Offset to 100, simply telling Photoshop to add this amount (in 15% opacity) to all pixels of the target channel. This brings the sky back to a reasonable blue and the greens to their original warm color.
- Save the Smart Object and close it. Set the top layer of the original image to Color to prevent any luminosity changes.
Ready! Figure 10 shows the result of the third method.
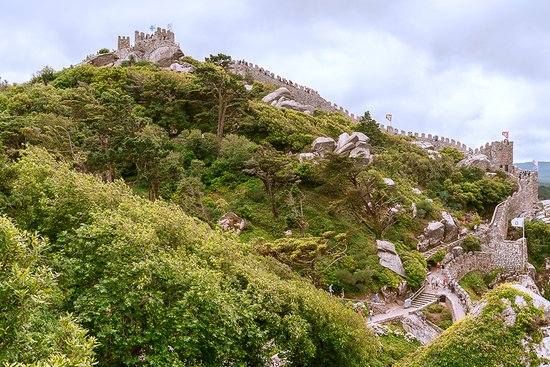
Figure 10. Final result of the third example (opacity still at 100%)
A comparison? All three look reasonable. The LAB version succeeds best in retaining the color of the greenery, but its sky is a somewhat unnatural blue. An optimal version can probably be obtained by reducing opacity of the top layer. The other two versions are pretty much equivalent.
Gerald Bakker, 22 Nov. 2018
Related articles
Photoshop by the Numbers
